

The windows clipboard is a shared memory space that allows you to transfer data between applications. Once you copy data to the clipboard it can be pasted to any application that can handle that type of data. This could be a fragment of text, a picture, wave data (sound), a file or folder, OLE-object, etc.
The Windows clipboard is a convenient tool, however it has several limitations; primarily it can only store one piece of data at a time. When you copy new data to the clipboard, the previous contents are destroyed and replaced by the new. Another limitation is that it is not easy to view what is stored in your clipboard without pasting it to some temporary place such at the notepad.
Memorizer was designed to overcome these difficulties. When Memorizer is running and you copy any new piece of data to the clipboard the previous contents 'clips' are not destroyed. By default Memorizer stores the 15 latest clips, but that can be increased to any desired number (customizing Memorizer). Moreover you can easily edit or view any clip that is stored by Memorizer (see actions).
Memorizer was developed as an "always running" application. That is why we concentrated on its stability and operation speed. Unlike similar utilities that also support all clipboard data formats, Memorizer works correctly and clearly even when copying huge amounts of data (for example from Excel) or when some buggy application damages a clipboard chain.
Memorizer eXP has been almost completely rewritten since the 1.xx releases to use less memory and operate faster (readme.txt).

To begin with we will need something to put in the clipboard. Just run Notepad, type in some text (or load a file), select it and strike Ctrl+C. The text you selected was copied to the windows Clipboard as usual and you can paste it (Ctrl+V) wherever you want as you would normally do.
Let's check what is in Clipboard now. Click on the Memorizer's icon
in the system tray or strike a hotkey
(Alt+V by default). Memorizer's menu will appear next to the
mouse cursor.
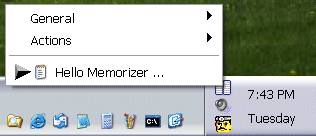
An arrow points to the current contents of Clipboard, if there is no
arrow at all, then the Clipboard is empty. but if you have followed
our instructions correctly you will see the text you copied in notepad. To
the right of the arrow you see the Notepad's icon, it is there to
remind you where you copied the clip from (customizing Memorizer).
If you select another piece of text in the Notepad and press Ctrl+C
the new text will be entered into the clipboard replacing the previous clip,
but Memorizer will still store it. Let's try to paste this old text.
Press Alt+V (or click Memorizer's icon in
the system tray), select the text you want to paste in the menu and strike
Enter or click it with a mouse, the text will be pasted into
the Notepad. Now the arrow in Memorizer's menu points to this
text indicating that it is in the clipboard, this means that now you can also
paste it just with Ctrl+V.
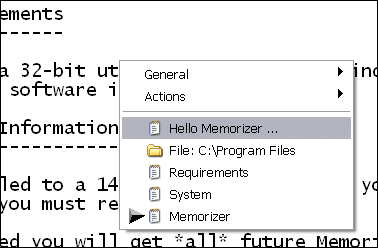
Let's do something more interesting. Double click My Computer,
select a "Program Files" folder and press
Ctrl+C. Switch back to Notepad and strike Alt+V (configuring hotkey).
Do you see the arrow pointing to the File: C:\Program Files?
It is in Clipboard now. Select this menu item (you need only to hi-light it,
please do not strike Enter) and press 'P', this means
paste as text (see actions). Now you will see
that the path to your "Program Files" folder has been inserted into
the Notepad (ex. C:\Program Files).
Do you want to edit or view the text we copied to Clipboard before the "Program Files" folder? No, it hasn't been destroyed, Memorizer stored it for you! Strike Alt+V (configuring hotkey), bringing up the Memorizer menu. Select the menu item (point it with mouse or keyboard but do not strike 'Enter') with the Notepad's icon containing the text we've previously copied and strike 'Space' (see actions). Now Notepad will be launched and the text will be in there.
The basic idea is the following:
So if you want to move a MEMORIZER clip into the clipboard, select it and use shortcut: C (copy to clipboard) or merely click on the desired item with your mouse.
If you want to paste a MEMORIZER clip directly into an active application, bypassing the Clipboard, use shortcut: ENTER (Paste).
If you want to open an item in its original application (that application which is indicated by the icon to the left of the item), select it and use shortcut: SPACEBAR (Open item).
Tip: Memorizer can handle any type of Clipboard data, including text, graphics, files/folders, OLE-objects or MS Word documents. Moreover you can open any type of data for editing in its original application with the "Open item" action described above.

Tip: When you select an item in the
Memorizer menu a preview window will pop up. The popup preview window
can be disabled by deselecting the "show preview" option in the
Options menu. (customizing Memorizer).
Tip: Remember that actions will be carried out either:
a) on the contents of the Windows clipboard, which are indicated by an arrow in the Memorizer Clip menu
b) the selected Memorizer clip as indicated by highlighting in the Memorizer Clip menu
c) the selected area in an active application.
The 'Actions' submenu could be accessed by either right-clicking and item containing data, pressing an 'M' key, or by clicking on the text 'Actions', located second from the top in the 'Clip' menu.
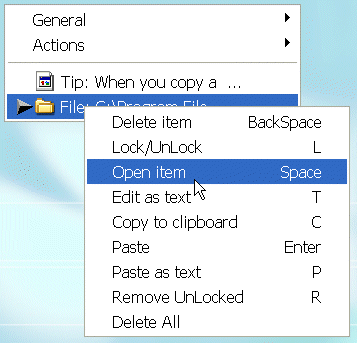
Note: the first two way to access 'Actions' submenu by right clicking an item may not be available on old versions of Windows (Windows 95 and NT 4.0). This is because these versions of Windows do not support multiple context menus.
The 'Actions' submenu which is accessed by clicking on the text 'Actions', located second from the top in the 'Clip' menu, is best utilized as a short cut reminder. When the Action submenu is visible, it is not possible to simultaneously highlight items in the 'Clip' menu, consequently all actions performed by clicking on actions will only apply to the Windows clipboard, - the item indicated by the arrow. If none of the items is indicated by the arrow (i.e. the clipboard is empty or Memorizer is ignoring the clipboard data) then the action is ignored.
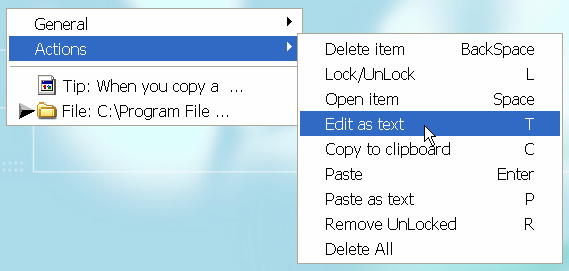
Once you have learned the shortcuts or printed them out, you will not need
to access that 'Action' submenu. To use a shortcut you first
hi-light which item you want to apply an action to (you should only highlight
it, please don't press Enter or click it) and then enter a
shortcut using your keyboard.

Available Actions
Note: for compatibility with previous versions of Memorizer 'F' shortcut was left as a synonym to 'L'.
Note: This procedure can take some time, so be patient, otherwise you may end up opening an application several times.
Note: if an item does not have text representation than its title will be thaken as text representation. For example if an item is a bitmap than the title will be Data: Bitmap.
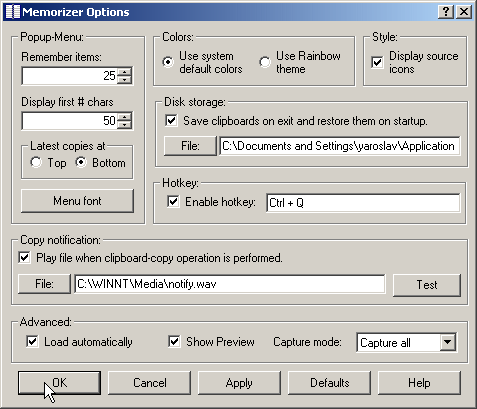
Tip: To get help on a particular option point at it with the mouse and strike 'F1' (or click on the "?" button at the top of the dialog and then point and click on the option) this will bring a "tool tip" window with a brief description of an option.
In the Memorizer Options dialog you can configure the following options.
Please read Ordering Information and Technical Support for further details.
| AY Labs homepage: | http://www.aylabs.com |
| Memorizer's homepage: | http://www.aylabs.com/memorizer.html |
| Order page: | http://www.aylabs.com/order.html |
| E-mail (support): | support@ayl.com xxx@abs.com |
| E-mail (sales): | sales@ayl.com xxx@abs.com |